Search This Blog

Showing posts with label make-up. Show all posts

28 October 2014

Mojito Loves | Clarins Instant Concealer

Clarins Instant Concealer

Clarins Instant Concealer

Clarins Instant Concealer

Clarins Instant Concealer

When I recently had enough Boots points for a beauty splurge, I decided to give the Clarins Instant Concealer a go after reading good reviews about it. I'm really glad I did - it was love at first use.

Concealer tends to have two very different functions – offering either coverage or brightening effects – and I’ve yet to find one that manages to do both very successfully. All too often, those that offer a decent level of coverage to disguise under-eye luggage or spots can be very drying. Brightening concealers, such as the infamous YSL Touche Eclat, don't provide any coverage at all. 

One of my main complexion issues is dark circles and dryness under the eyes. When combined with pink eyelids, this has the effect of making me look constantly tired. At 35 weeks pregnant, I am constantly tired, but it doesn’t mean I want to look it! I also have red thread veins around the side of my nose and redness on my cheeks and chin, so concealer is one of the products I never leave home without.

Clarins Instant Concealer: Texture and application

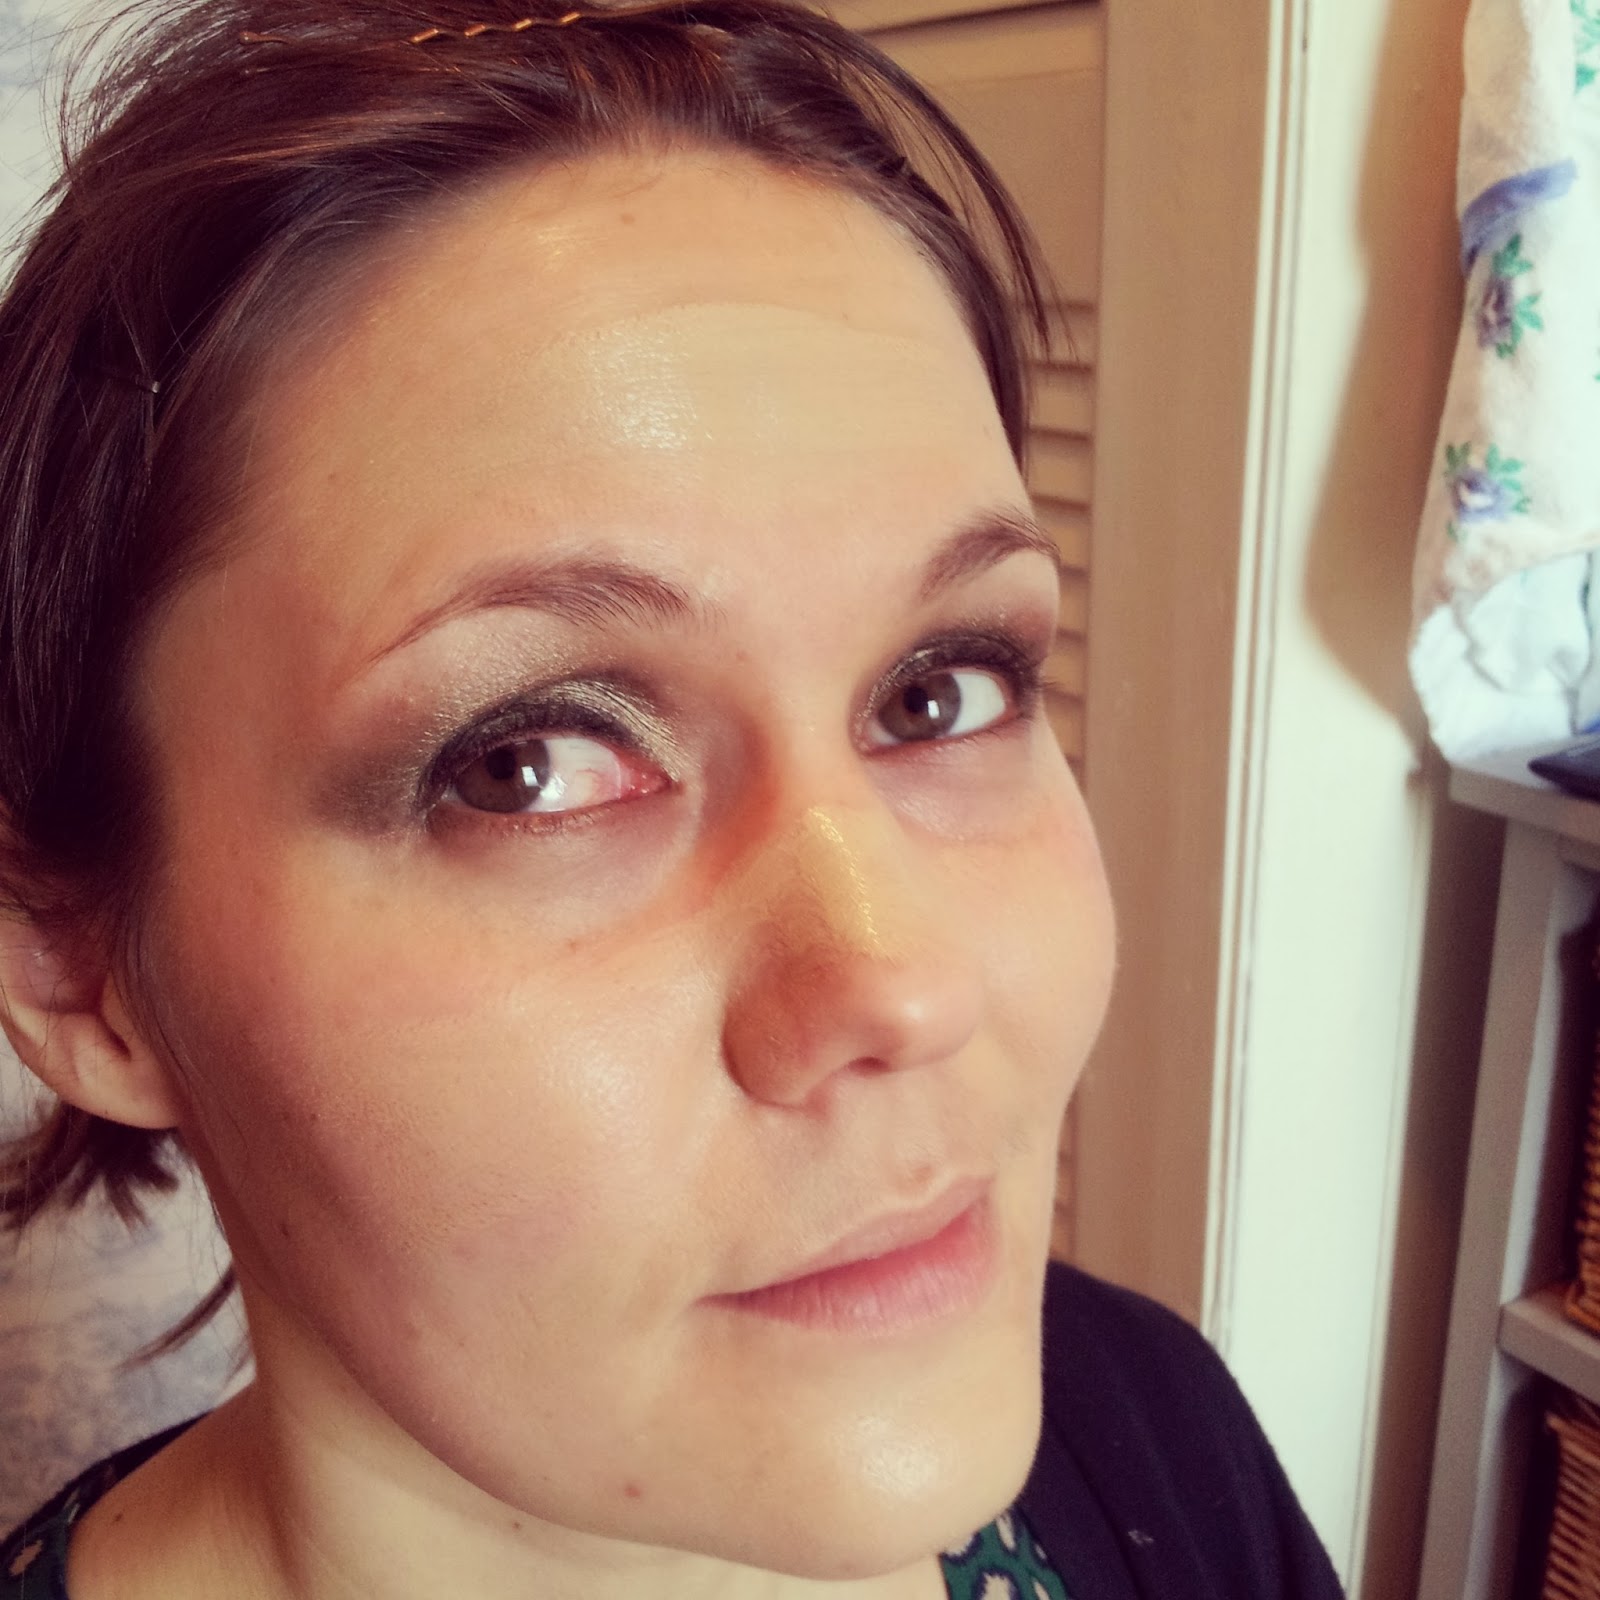
With its light texture, a medium buildable coverage, and light-reflecting particles, the Clarins Instant Concealer is pretty much the perfect consistency. Its creamy formula is a dream to apply. A little goes a long way – as you can see in the image above, a small amount covered all of my problem areas. I find it applies best with the ring finger to smooth it on and then pat it in. Best of all, it doesn’t go cakey – even on my dry skin and when reapplied throughout the day.

Clarins Instant Concealer: In action

It’s being marketed specifically as an under-eye concealer and it really does conceal dark circles and brighten this area very well. I’ve also been using it to cover imperfections elsewhere on my face and it does an equally good job there, concealing the thread veins around my nose and the redness on my cheeks and chin, whilst still looking natural. I’m seriously impressed.

Here it is on the right side of my face (the left as you look at it) - under the eyes, on the eyelids, around the nose and on the cheeks and chin - I look so much fresher and all the redness has been well concealed.

Clarins Instant Concealer

Clarins Instant Concealer: Should you buy it?

There are currently only three shades in the range so it’s not ideal if you have very dark skin. I have 01 which is a perfect match for my pale complexion. At £21.00, it’s an investment product but one which really delivers for me. I would definitely purchase it again – even if I don’t have enough Boots points to foot the bill next time!
 

You can buy the Clarins Instant Concealer HERE.

27 August 2014

1970s inspired vintage wedding


I was recently lucky enough to be involved in a gorgeous 1970's inspired wedding photo-shoot which has now been featured on the Festival Brides wedding blog - very exciting!

It was a real treat for me to be able to get creative with my make-up bag to help produce a stunning vintage feel. Of course, the make-up look that I created was only one part of the equation and I loved seeing the looks come together over the course of the evening as some talented people got to work on our models, Grace and Flick.

The shoot was both styled and shot by Shelley Richmond. As well as being an amazing photographer at Diamonds and Doodles, Shelley also runs a budget wedding blog, Pretty Thrifty. If you’re a bride-to-be looking for inspiration on how to do a budget wedding in style, you should definitely take a look. I’m not even getting married and I love reading the blog! 

Amy McCullagh did an amazing job with the hair, and the flowers and flower crowns (HOW gorgeous?) were by of the wild. Proving that wedding dresses don’t have to cost a fortune, the dresses used in the shoot were all supplied by Vintedge and Vintage Sweetheart.

Here are some behind-the-scenes shots taken on my phone, but I was blown away when I saw Shelley’s final edit over at Festival Brides. 

Take a look - I'd love to know what you think.

x

Summer of Love vintage wedding photoshoot

Summer of Love vintage wedding photoshoot

Summer of Love vintage wedding photoshoot  
Summer of Love vintage wedding photoshoot

Summer of Love vintage wedding photoshoot

Summer of Love vintage wedding photoshoot

Summer of Love vintage wedding photoshoot

Summer of Love vintage wedding photoshoot
The Beauty Scriptures

Summer of Love vintage wedding photoshoot

Summer of Love vintage wedding photoshoot


29 July 2014

Metallic make-up look using my favourite budget eyeshadow palette

Molten metallic eye look created using
Sleek's iDivine palette in Storm
I’d not long had Sleek’s iDivine palette in Storm when I blogged about it back in May. Whilst I liked it then, a true test of a product is how much use it gets after the initial New Purchase excitement has dissipated. A couples of months in, I still love it.

As is often the case with palettes, there are some colours that I’ve not used much but there are a few shades that I’ve been wearing almost every day – day and night. Molten and shimmery yet very wearable, individually they are gorgeous. Together they are the perfect trio:
Sand Storm: A gorgeous warm-toned gold. Often these type of shades can be too yellow which is hard to pull off, but this has a slight copperyness to it which makes it very flattering.
Thunder Storm: This pretty cool-toned gold suits most skin tones, and again, doesn't contain too much yellow.
Dust Storm: Rich and sumptuous, this is a warm-toned rust-bronze that will complement all eye colours, but it really makes blue eyes pop.
Combined with the matte Calm Before The Storm and Eye Of The Storm - neutral-toned nudes that are great for shading (and for eyebrows) - you can create numerous wearable looks for every day or for a special occasion using these five shades.


Here I've used them with some other fantastic drugstore products on my friend Grace to create what I think is the perfect look for these balmy summer evenings. Not only is it simple to achieve it's affordable too, with every product coming in at less than £10.00.

Before
After: Metallic eyes + nude peachy lips = gorgeous

Achieve the look

1. Start by applying a light wash of Maybelline Colour Tattoo Cream Eyeshadow in On and On Bronze across the eyelid. The colour won't end up showing through, but it acts as a fantastic base for powder shadows. Think of it as a (budget) coloured eye primer.

2. Next use the pale gold shade from the Storm palette, Thunderstorm, all over the eyelid.

3. Apply the warm gold shade, Sand Storm, to the outer third of the lid - blending upwards above the crease slightly.

4. Lightly apply the rust-bronze shade, Dust Storm, to the crease, blending well.

5. Next, take the same shade, Dust Storm, along the upper and lower lash line, building up until you get your desired level of colour.

6. Lastly, apply lashings of black mascara. I used my trusty Max Factor Masterpiece Max here after curling Grace's lashes.

7. The look is finished off with a combination of Calm Before The Storm and Eye Of The Storm on the brows, and a gentle wash of peach on the cheeks (Bourjois Cream Blush in 01 Nude Velvet) and lips (Bourjois Rouge Edition in 17 Rose milesime).

You'd never know that every product used here cost
less than £10.00
This is a really achievable look for every budget and skin tone. In fact, Grace loved it so much she went out and bought pretty much everything I used the very next day!

Have you tried any of the other Sleek palettes? Are there any shades you can recommend?

11 May 2014

Bargain eyeshadow palette

For £7.99, you could be forgiven for having low expectations of the Sleek iDivine Storm palette, but here's one product that under-promises and over-delivers. 

Sleek iDivine Palette in Storm
Sleek iDivine Storm Palette offers 12 shimmery and matte shades
Sleek iDivine Palette in Storm
Appropriately sleek packaging
Sleek iDivine Palette in Storm
L-R: Sand Storm, Snow Storm, Calm Before The Storm, Thunder Storm, Perfect Storm, Firestorm

Sleek iDivine Palette in Storm
L-R: Dust Storm, Gathering Storm, Storm Cloud, Electric Storm, Eye Of The Storm, Blackout
Shade range
Well, there's a gorgeous mix of twelve shimmery and matte shades, from pale gold through to deepest black. One of the great things about palettes is that the colours have been pre-selected for you so you know they'll work well together and there are endless possibilities for colour combinations here. Of course, each colour can be worn alone too. Each of them is very wearable. The golden and darker shades will suit most skin tones, whilst the pinkier colours will look amazing on darker, Asian and black skin tones. 

Pigmentation
The shadows in the Storm palette, for the most part, are really well pigmented. The pale shimmery shade, Snow Storm, hasn't shown up well in the pictures but it actually applies beautifully on the eye. The darker shimmery shades, including Sand Storm, Dust Storm and Storm Cloud, are amazingly well pigmented. The two paler matte shades, Calm Before The Storm and Eye Of The Storm, don't fare as well on the pigment front, but they are still good for shading in the crease and they work perfectly well as eyebrow colours. The darkest matte shade, Blackout, is super pigmented. In fact, I had trouble getting it off my arm after swatching.

Wear time
Speaking of staying power, I find these shadows work best with a primer underneath. But then so do all eyeshadows on me. I got a good nine hours wear out of them, with only some fading as the day wore on. Without primer, it was more like six hours wear time - still pretty good considering the price. 

Blendability
One thing to note is how soft the shadows are. Whilst this makes blending a breeze, it does result in some drop down. I found it best to tap any excess off the brush and blend the colour into the back of my hand before applying to the eye to minimise drop down.

Packaging
This palette really is sleek by name and sleek by nature. It's small enough to be easily transportable and comes with a decent mirror inside. The double ended foam applicator isn't something which I'd use as I prefer to use a brush, but it could be good for emergencies I guess.

Dupes
It would be rude to mention this palette without drawing comparisons with its pricier cousins in the Urban Decay Naked range. Along with Mac, Urban Decay eyeshadows have been my favourites for years because I really rate their staying power, pigmentation and amazing choice of shades. Whilst the Sleek shadows aren't quite in their league, and the colours not exact matches for the Naked palettes, they give them a damn good run for their money. The Naked palette is £37.00. The Sleek palette is £7.99. 'nuff said.

Verdict
I've been seriously impressed with the Sleek iDivine Storm palette. It offers a gorgeous colour selection and outstanding quality and value for the price. There are 16 other palettes in the iDivine range and I can't wait to give them a go. I picked mine up from Superdrug where there's currently a 3 for 2 offer on.

Sleek iDivine in Storm | £7.99  

16 February 2014

Today's Face

With a little more time to spare than I have midweek coupled with a desire to keep things simple for the weekend, today's look is a glowy affair. Light reflecting foundation, highlighted cheeks and golden eyes are just the ticket for perking up a tired face the morning after the night before.

The Beauty Scriptures Today's Face

The Beauty Scriptures Today's Face

The Beauty Scriptures Today's Face

Face


Cheeks

Nars Blusher, Deep Throat from the 'At First Sight' palette
Jemma Kidd Dewy All Over Radiance Cream, Rose Gold (Discontinued - boooo)

Eyes

Bare Minerals Eye Shadow, Stay Golden (Limited Edition)

Brows

Nars Eyeshadow, Bellisima from the 'At First Sight' palette

Lips


So that's me for today. 
What's your favourite weekend look?

x

2 February 2014

Step by step 1920s make up look

Perfectly defined red lips and rosy cheeks are classic 1920s but this decadent look isn't just confined to the history books. Molten gold and moss green eyes keep things fresh and modern, perfect for any glamorous night out.
Before and after.

Shop the look

These are the products I used, but they can be substituted and still give a similar look.  

Face:Smashbox Photo Finish Primer, Origins Plantscription Anti-aging Foundation in Light Warm, Bourjois Healthy Balance Compact Powder in Beige Clair
Eyes: Urban Decay Eye Primer Potion, Rimmel Exaggerate Waterproof Automatic Eye Definer in Noir, Bare Minerals eyeshadow in Stay Golden (limited edition), Mac Eye Shadow in Sumptuous Olive, Max Factor 2000 Calorie mascara in Black, No.7 Pecise Liquid Eyeliner in Black
Eyebrows: Mac Eye Shadow in Concrete
Cheeks: No. 7 Natural Blush Tint Powder in Soft Damson, Jemma Kidd Dewy All Over Radiance Cream in Rose Gold (discontinued)
Lips: Max Factor Colour Elixir Lip Liner in Red Rush, Max Factor Colour Elixir Giant Pen Stick in Passionate Red


Recreate the look

Step 1

After applying Urban Decay Eye Primer Potion, line the upper lash line with Rimmel black eyeliner, smudging with a fine angled brush to create a flick at the outer corner. Next, adding a wash of Bare Minerals eyeshadow in Stay Golden creates a gorgeous molten effect. Building up the colour in fine layers rather than in one block not only makes the shadow easier to work with, it also helps to improve longevity. Stay Golden was a limited edition shade, but Urban Decay's Maui Wowie will give a similar, albeit more glittery, look.

Molten gold lids give a contemporary feel to this classic look.

Step 2

Using a fluffy brush - I used Mac's 217 - apply Mac's Sumptuous Olive eye shadow to the crease and outer third of the eye lid. Blend really well to create a seamless effect and remove any hard edges. Apply a fine line of Sumptuous Olive along the lower lash line using a smudging brush and finish with a couple of coats of mascara.


Apply a darker colour to the outer third of the eye.

Step three

When creating a strong eye look, there can be a lot of eye shadow drop down under the eyes. This does a fine job of emphasising any dark circles, something we obviously want to avoid! So whilst applying eye shadow before your base may seem illogical, it actually makes perfect sense. Often you can simply sweep it away with a clean brush, but I soaked a cotton pad with Bioderma Micelle Solution to ensure every last trace of unwanted shadow was wiped away.

Eye shadow drop down emphasies dark circles - remove with cleansing water .

Step four

After smoothing Smashbox Photo Finish Primer over the skin, I applied Origins Plantscription Foundation with a Bobbi Brown Foundation Brush, starting in the centre of the face and working outwards. This foundation provides great coverage with a healthy, natural looking finish - win win. The colour Light Warm was a perfect match for Anna's skin, which if you've read my piece about The Flawless Miss Lawson, you'll know IMHO, is key. Using the flat side of the brush I patted a little extra foundation around the cheek area to provide more coverage and disguise any redness. A sweeping of powder provides the matt, long lasting finish which any flapper girl needs to ensure she remains shine-free even after charleston-ing the night away.


Applying foundation after eye make up create a flawless look.

Step five

Next up I lined the lips with red liner, emphasising the cupid's bow to create a classic 20s feel. I went for a pink-toned red, with a subtle shimmer, to fill in the lips using the gorgeous Max Factor Giant Pen Stick in Passionate Red. This universally flattering shade is great for women who are taking their first tentative steps into the world of red lips, and the pencil style applicator is a doddle to apply.


Emphasise the cupid's bow for a classic 20s look.

Step six

I like to apply blush last to see how the eyes and lips are working together. All that was needed here was a very light dusting of a rosy toned blush, applied in circular motions to the apples of the cheeks. Gold-toned highlighter along the top of the cheek bones and under the brows ensures the skin catches the light in all the right places. Next up I feathered Mac's Concrete eye shadow through the brows using a fine angled brush. Bringing the line down at the outer corner slightly gives a nod to the 20s without replicating the era's unflattering trend for super thin brows. Lastly, a flick of black liquid eyeliner gives the eyes a final kick of definition.

Fresh and modern with a 1920s twist.

The finished look

Here you can see how accessories make all the difference to the finished look. The make up looks pretty and modern in the photo above, but paired with pearls, a hair band, a nude beaded dress and a feather stole, it takes on a vintage feel. The gentle waves were created using the Babyliss Waving Wand, adding a touch of movement to Anna's usually poker-straight locks. Simply gorgeous! 


Vintage accessories finish off the 1920s look.*
I hope you've enjoyed my first step by step guide. Do let me know if you attempt to recreate the look yourself or if you have any recommendations for products that offer a contemporary vintage look.

Love,

Miss Mojito

x

*Photograph by Laura Florence Bainbridge.

1 January 2014

The ghost of new year's past

As we settle into 2014, and I've just about recovered from the previous night's festivities, I'm reminded of last new year's eve. 

Illness had struck and I'd succumbed to the grips of the lurgy. Red nosed and sneezing every 30 seconds, with an absolute bitch of a spot on my chin, it's fair to say I wasn't feeling or looking my best.

Never one to turn down an invitation to a soiree and with the prospect of champagne on ice waiting for me, I set about making myself look vaguely human again. This was no mean feat.

Taken just two hours apart, THIS is why I love make-up.  


Now, let us not beat around the proverbial bush. Exhibit A, i.e. the "before" shot is pretty much the worst photograph that's ever been taken of me. Could I look anymore sorry for myself? 

Exhibit B? Rosy cheeks instantly brighten a weary face. Smokey green eyes detract from the redness around my nose and chin, which my trusty Double Wear concealer did a fine job of disguising. A nude lip is suitably low maintenance for an ailing lady wanting to sip champagne of an evening. Not too shabby. Even if I do say so myself.


And that, ladies and gentlemen, is why I love make up.

Love, 

Miss Mojito 

xxx